Learn how to present information while still being able to see your meeting participants.
Watch the video options below or follow the step-by-step instructions for Windows or Mac in the tabs below.
How to Split Screen Google Meet
- Join a Google Meet
- Open the content you are going to present in another tab.
- If you are in full-screen mode, “Restore Down” icon in the upper right-hand corner of your browser window to exit full-screen mode
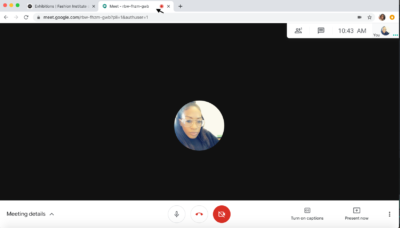
(Full-Screen Mode)
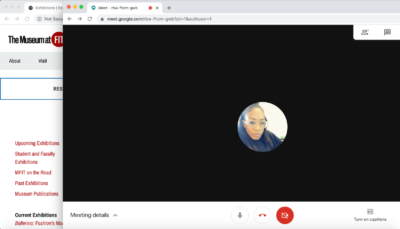
(Normal mode)
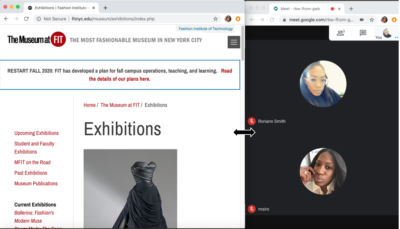
- Separate the tab you are presenting from your Google Meet tab by clicking on the Google Meet Tab and dragging it away from the other tab until you have two separate windows.
- Choose the program window that you want to snap to one side of the screen. Click on its title bar and drag it to one side of the display until the mouse pointer touches the edge. You will see a light outline of where the window will appear on the screen. Release the mouse button.
- The window should now be snapped to the side of the screen, and you should see all the other open programs appear on the opposite side of the screen.
- Click one of the other program windows. It will snap to the other side of the screen, so you’ll have two windows side-by-side.
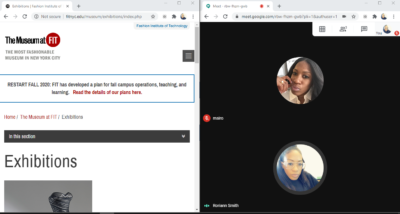
- By default, the windows will be split evenly on your screen. You can adjust that by putting the mouse between the windows – you should see the pointer turn into a two-headed arrow – and then clicking and dragging to change the width of the windows.
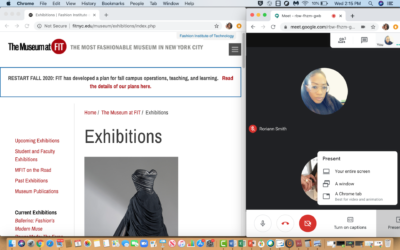
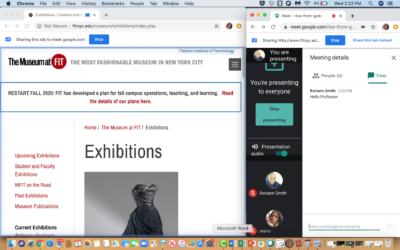
- In the bottom-right corner of your Google Meet Screen, select Present now.
- Select “A Chrome tab.”
- Select the content you want to share.
- Select Share.
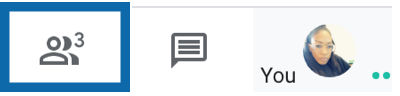
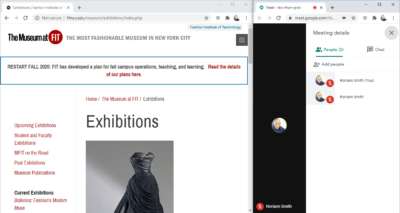
- To view the Participants, Click on the people icon in your Google Meet window.
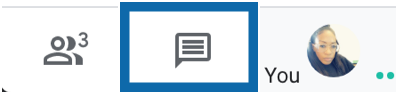
- To view the Chat Panel, click on the chat icon in your Google Meet Window.


How to present multiple tabs
- Follow steps 1-6
- Select “A Window”.
- Select the window with the content you want to share.
- Select Share.
- Follow steps 8-11

Log into your Google Account
Go to the My Account Page (https://myaccount.google.com/)
Click on Device Activity and Notification

Under recently used devices click Review Devices

From the list find the lost or stolen phone or device and click “remove”

When you are finished working on your FIT Remote Labs computer or your class session is over. You must sign out properly, or you may prevent other students from accessing the computer. Do not just close the tabs, you must sign out following the instructions below.
For Windows:
To sign out, go with the windows menu icon, scroll to the profile icon (person silhouette), and select “Sign out”.
For Mac:
To log-off, go to the apple icon, scroll to, and click on Log Out. Then close the computer name tab.
Tech Tip: make sure you are selecting the sign out option on the FIT Remote Labs computer and not your home computer.


If you have not timed out of the “Leostream” tab, return to the “Leostream” tab and click “Sign out..” on the Resources window.

Go to the Website: http://myfit.fitnyc.edu
- Enter your FIT Username
- Enter your FIT Password
- Click the “Sign in” button
First time logging in?
The Division of Information Technology does not send your login information. Find out how you are sent your login details in the Self-Service Article, “What are my username and default password?”.

1. Go to www.google.com or you can go directly to the app you wish to access; gmail.com, sheets.google.com, docs.google.com, etc.
![]()
2. Click on the “Sign in” button in the upper right corner of the Google homepage.
If you do not see the “Sign in” button then you may already be signed in with another Gmail account; follow the How to log in to more than one Gmail account instructions or sign out of that account and sign back in with your FIT account.
![]()
3. Type your FIT email address and FIT password into the fields, Click “Sign in”
You must type your email address not your username

4. If you are accessing a new computer or recently changed your password you will need to verify with your 2-Step Verification option to log in.
5. Open the Apps launcher by clicking the grid of nine little dots in the top-right corner of most Google pages near your profile photo.


Related Policies
Supported Browsers
FIT Remote Labs, powered by Leostream is compatible with most up-to-date browsers including Google Chrome, Firefox Safari, and Edge.
Sign in to FIT Remote Labs
Go to https://fitlabs.fitnyc.edu/
Sign in with your FIT username and password
Click the “Sign in” button

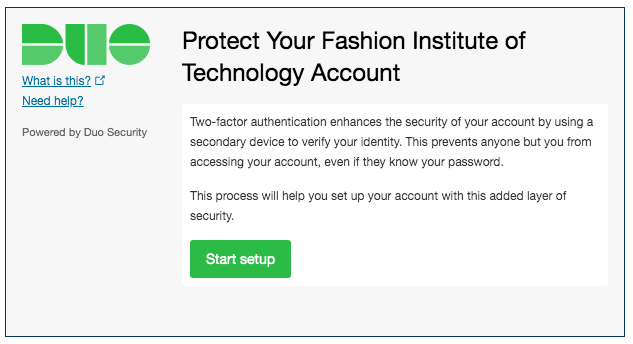
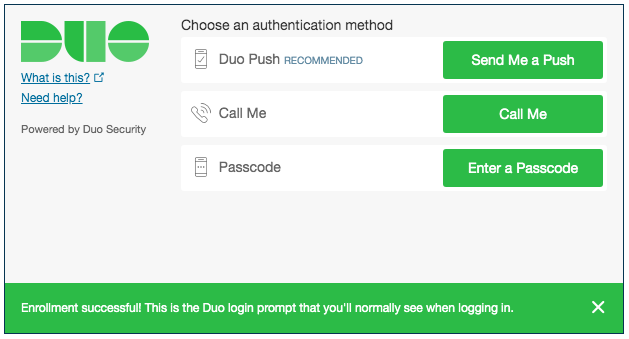
Duo Two-Factor Authentication
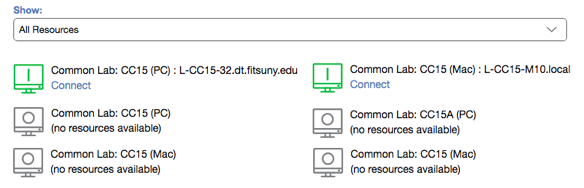
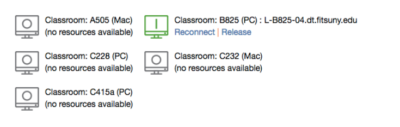
FIT Remote Labs Resources
Once you sign in and complete the two-factor authentication with Duo, you will be directed to the Resources window. The Resources section lists your offered desktops. Note: Message Board can be collapsed using the “X” button at the top-right of the Message Board.
Click Connect to launch a connection to a desktop.
Only connect to Classroom computers during the date and time of your course, the scheduled time you’d be in that room if the course was held in-person. If you are scheduled into the same room for multiple courses, you will only see one selection for that room.
Note: You do not have to connect to a computer with the same operating system as you are using (Macs can connect to “PC”, Windows can connect to Mac).

Tech Tips
-
The Computer Commons computers will display as “Common Lab”.
The Computer Commons, rooms CC15, and CC15A are available for remote access for all current FIT students except during maintenance windows.
Connecting
A new browser tab will open and the connection should begin loading.
Just like if you were at a computer on campus it may take several minutes for your profile and all the applications to load. Note you may see different images/pop-ups.


Once authentication and desktop loading is complete, you will see an FIT campus computer desktop in your browser tab.
If connecting to a Windows computer, you will automatically be signed in and may begin using applications on the FIT Remote Labs computer.

If connecting to a Mac computer, you will need to sign in to the computer with your FIT username and password.

Sign out when finished
When your class or session time has finished, please sign out properly to ensure the next student is able to access the computer. Follow the instructions, How to sign out of FIT Remote Labs.


After you complete a booking, you will be sent a confirmation email to your FIT email that will include an option to add the booking to your calendar and the details you will need to complete the check-in process.
Add the booking to your calendar click on the “Add to calendar” option in the confirmation email.

After you click “Add to calendar” you will be able to edit the calendar title and other details. Please note that changes to the calendar do not update or change your booking.

How to report phishing:
1. Click the three dots next to the reply arrow next to “Reply and then select “Report Phishing” from the menu

Click “Report Phishing Message” in the message window.
The email will be moved to Spam. You may delete the email from Spam. If you accidentally mark a message as phishing, navigate to the email in Spam repeat step 1 and select “Report not phishing” and the email will return to your inbox.

Learn how to identify phishing. View our Phishing Guide.
Pay-for-Print Limitations
- There is no printing from personal devices (laptops, phones, etc.)
- No duplex (double-sided) printing
- No custom paper stock (must use paper supplied in printers)
- Only paper size selections acceptable are: US Letter 8.5. x 11 (Portrait or Landscape), Tabloid 11 x 17 (Portrait) and Ledger 17 x 11 (Landscape)
- No B&W printing from Mac computers in the Library (use Windows) or convert the files to grayscale
- Printers in classrooms and labs are set to “Draft” or “Eco-mode” for faster printing and to use minimal ink. For photo or presentation-grade prints, please visit PrintFX and FabLab for professional printing services
Go to a Print Release Station
Print Release Stations are located:
- Computer Commons, Feldman Center CC15
- Peter G. Scotese Facility, Feldman Center C220 Suite
- FIT Library, Goodman Center 5th and 6th Floor
- Kaufman Hall Cyber Lounge
There is signage posted to indicate the location, or you can ask a lab monitor for assistance.
To release your print job and pay for your prints, press any key on the keyboard or move the mouse at the Print Release station.

Identify Yourself
Enter your FIT Username in the Logon ID field
Enter your FIT Password in the Password field
Click the Logon button

Swipe your FIT ID
You will be directed by the Card Logon screen to “Please swipe your card”
You will find the card reader attached to the monitor or near the keyboard at the Print Release Station.
Follow the instructions on the card reader, swiping the ID with the magnetic stripe towards the green sensor light.

Release Print Jobs
Select a job by clicking on the Job Name you wish to print. Review the details upon selection.
- Sheets – Specifies the total number of pieces of paper required to print the job(s)
- Cost – Specifies how much your account will be charged for printing the job(s)
- Balance – Displays the amount on your account. Tech Tip: If the balance is in parentheses ( ) then the balance is a negative number. Your balance must be a positive number that covers your job order.
Once you are confident in your selection click Print. Proceed to the appropriate printer to pick up your print outs.

Deletion and Canceling of Print Jobs
Print jobs are not released until after you have entered your network password at the print release station and selected which jobs you wish to release. Jobs that have not been released within 10 hours will be deleted from the printer queue. If you wish, you may also select the job from the Print Release Station and select Delete.
Printer Malfunction/Refunds
We make every effort to keep the printers in good working order; however, if you receive poorly quality pages due to low toner or other printer malfunctions. Please inform the technician/lab monitor on duty, who will either re-print for you at that time or will help you to fill out and submit a Refund Request Form; a refund will be credited to your account if it is determined a printer error occurred.
Related Self-Service Article
On June 9, 2021, FIT launched Self-Service Password Reset (SSPR) from Microsoft. See Change Announcement to learn more.
- You must know your current FIT Password to register; you cannot register if you have an expired password.
- You will need to register for Self-Service Password Reset (SSPR) in order to change your password without TechHelp assistance.
- If you have not completed the registration steps outlined below before your password expired or need assistance with a generic email account (i.e., [email protected]), please contact TechHelp for support.
1. Click the “Register to use SSPR” button on this page or from the Password Help Center to be directed to the Self-Service Password Reset (SSPR) registration page. Note you will be redirected to a Microsoft page as our SSPR is a Microsoft product.
2. Enter your FIT email address and click the “Next” button.
Note: the page will load with a Microsoft logo, the FIT logo will appear after you enter a valid FIT email address.

3. Enter your FIT password and click the “Sign in” button.

4. Enter your response to “Stay signed in?” Recommended: If you are on a shared computer select “No”.

5. You will be presented with a screen to configure your phone and/or email to use the Self-Service Password Reset. You’ll need to set up at least one of the options in order to access your Office 365 account and use Self-Service Password Reset.
Click “Set it up now” next to the option you wish to register.

Please note: if you have already registered you will be presented with an option to change or verify your authentication details.

6. Enter your authentication details and verification code. Please note it may take a few minutes to receive your verification code.
Phone Example:
Enter your phone number, then select. Select “text me” or “call me”

If you selected “text me” check your phone for the verification code sent. If you selected “call me” you will receive a phone call with an automated recording, press # to hear the verification code, please note if you have call screening the recording will start automatically when the call “appears” to be picked up.

Email Example:
Enter an email address you have access to that is not your FIT email address. Select “email me”


7. Click the “finish” button. You are now registered to use Self-Service Password Reset (SSPR)!
Note: if you need to change or update your Authentication methods click “Change” and follow steps 6 and 7 again.

8. You will automatically be redirected to your Office 365 Account, My Apps page.
You may continue with using the Office 365 apps you have access to or sign out when you are finished.
To sign out: click on your initials in the upper right-hand corner and click on Sign Out.
