If you need to run Windows-only applications but you only have a Mac computer, Bootcamp will allow you to run Windows 10 on your Mac. Bootcamp is free for FIT students and $14.99 for Faculty and Staff.
Minimum Requirements:
How to find the age of your Mac
Installation Instructions
Install Bootcamp and Windows 10 on a 2015 Mac or newer
Install Bootcamp and Windows 10 on a Mac older that 2015
Tech Tip
The Bootcamp and Windows 10 installation does not delete or move any of your existing files, folders, applications on your Mac. However, it is good practice to have a backup of all files that are important to you.
Your FIT Google Drive is a great location for backup files.
Additional Help
Please contact TechHelp by opening a ticket at TechHelp.fitnyc.edu
We recommend that all FIT students, faculty, and staff protect their personal computers from malicious software, inappropriate websites, and viruses by installing a high-quality antivirus program. In addition, antivirus is required for any computer trying to connect to FIT VPN. Note: don’t install additional antivirus software on any device distributed/issued by FIT even if it is used off-campus; it will already have antivirus installed.
Paid antivirus products, usually costing about $75 per year, offer the best protection. Often a household can purchase one antivirus subscription that covers many computers. If you choose not to purchase this software, you can install Sophos Home on up to three (3) Mac and Windows computers. Please review the system requirements and uninstall any existing antivirus software before you install the Sophos Home Software.
To install Sophos Home you will first need to create a Sophos Home account. Go to https://home.sophos.com and enter your first name, last name, email address and password then follow the instructions to activate your new account. You do not need to use your FIT email or FIT password Sophos Home accounts do not sync with FIT and are not managed by the Division of Information Technology.
Follow the step-by-step instructions from Sophos on how to download Sophos Home, install, and manage device settings. For additional Sophos Home help please visit https://home.sophos.com/help#.
Note that while Sophos Home is free forever, Sophos will try to upsell you to Sophos Premium, which is a paid service, by making Premium available at no cost for the first 30 days. After 30 days Premium protection ends but standard Home protection continues. FIT will not reimburse you for Anti-Malware software or manage Sophos or any other Anti-Malware on your personal devices.
Learn how to install Word, PowerPoint, Excel, Access, and OneNote with your free Office 365 subscription today. Install the latest versions Office for both Windows (PC) and Mac.
Offer and access is not available to Pre-College, Continuing Education, and Seminar Students
Sign in to your Office 365 account using your FIT email and password; for step-by-step instructions, visit How to log in to Office 365.
Then follow the link to the latest instructions from Microsoft.
Installation on a mobile device
1. Click on the appropriate store button for your mobile device and click install.


2. After the installation is complete, open Duo on your mobile device. You will be presented with the message, “Duo Mobile” Would Like to Send You Notifications”
Recommended: Click “Allow”.

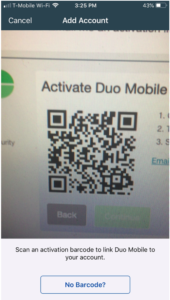
3. Click “ADD ACCOUNT” button under the text “New to Duo?”

4. You will be presented with the message, “Duo Mobile” Would Like to Access Camera”
Click “OK” (You will need to have this enabled to scan the QR code verification).

If you installed the Duo app after being instructed through the enrollment instructions, return to the enrollment window, and click I have Duo Mobile installed. Then scan the activation barcode.

You may have your chosen first name display for Google Meet, Gmail, and other G Suite apps by changing your Google Profile name.
Changing your Google Profile name has these benefits:
- It creates a DISPLAY NAME in all caps across many key locations within the Google suite.
- While the FIT email address will continue to display in much smaller text below the display name, FIT account holders who know you by your chosen name can search for you within type-ahead search boxes across Google using your chosen first name. (Over time, type-ahead search improves as the same people search for your chosen first name.)
At this time, for external individuals (non-FIT account holders) to contact you, they will need to address you with your FIT email address. However, IT is working on a solution for this and will update this document once the chosen first name is available within the FIT email address.
To change to your first name, follow these steps:
1. Sign in to your FIT G Suite account.
2. Go to your “Manage your Google Account page.” There are two ways to get there:
- Go to https://myaccount.google.com/personal-info. The link will open to your Default account. If you have more than one Google Account and your FIT Google Account is not your default, you may need to click on the profile photo/icon in the upper right-hand corner and switch to your FIT Google Account
- From your FIT Gmail account, click on the Google Apps icon, and select “Account” from the apps list. Then select “Personal Info.”


3. Change your profile name.
Under the “Profile” section, click the arrow “>” to the far right of “Name.”

You will be required to verify your password to continue. Enter your password and click the “Next” button.
Next, change the “First Name” field to what you would like to use, then click the “Save” button.

Your change may take several minutes to appear in Google Meet, Gmail, Google Chat, and other G Suite apps that display your profile name.
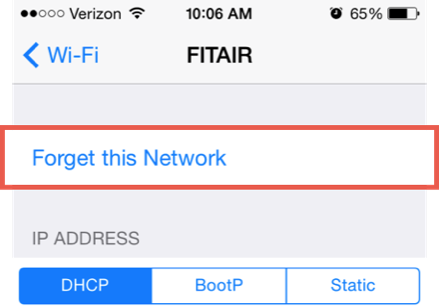
How to Forget FITAIR on iOS devices
Phones and tablets cache your password setting for connecting to WiFi networks in order to connect you faster. Please follow these steps to ensure that your account will not get locked out by a wireless device.
- Select “Settings” from your Apps

- Select Wi-Fi
- Tap the info icon or the blue arrow next to the FITAIR network
- Select “Forget this Network”
- Select “Forget”
- Go to How to Connect iOS to FITAIR and re-connect your device with your new password.


How to Forget FITAIR on an Android device
Note screenshots and instructions may vary slightly depending on your device and operating system.
1.) Open your phone’s Settings app

2.) Navigate to saved WiFi networks, select Connections or Network & Internet, then Internet.
Tech Tip: On some phones, you can just tap the Wi-Fi network you’re connected to and select Saved networks, then jump ahead to step 4.
On some phones, navigate to Wi-Fi settings and then select Advanced. This may be hiding under a three-dot menu in the top right-hand corner.

3.) Now you’ll see a list of all the Wi-Fi networks currently saved on your phone.
On some phones, you may need to go to your advanced Wi-Fi settings, select Manage networks. This is usually found beneath Network Settings.

4.) Select FITAIR, and select Forget.
Go to How to Connect your Android Device to WiFi and re-connect your device with your new password.

How to forget FITAIR on a Mac
If you are connecting to FITAIR on an Apple computer and recently changed your password and are having problems reconnecting to WiFi, you will want to follow the steps below.
1. Go to System Preferences
Method 1: Find system preference in your dock
Method 2: Click the Apple icon in the top left corner of your computer and selecting System Preferences from the drop-down menu.

2. Select Network
In the System Preferences pane click the Network icon.

3. Click on Wi-Fi on the left pane then click Advanced

4. Select FITAIR, click the minus sign and click done. You have now successfully forgotten FITAIR

How to forget FITAIR on a Windows 10 devices
If you are connecting to FITAIR on a Windows 10 computer and recently changed your password you will want to follow the steps below.
Click the WiFi icon in the lower right-hand corner
Click “Network settings”
Click Manage Wi-Fi Networks
Find FITAIR and click “Forget”
How to forget FITAIR on a Chromebook
Click on the WiFi icon in the bottom righthand corner of the screen (near the time).
Click the on FITAIR to open the Network Settings window

Click the “Forget” button Network Settings page

Related Self-Service Article
A media access control address (MAC address), unique identifier for your device connecting to a network, sometimes called physicall address.
An Internet Protocol address (IP Address), is a unique string of numbers separated by periods that identifies each computer over a network.
You will need to know how to obtain your MAC address to register a device on the wired network at FIT Residence Halls. You may be asked to provide an IP Address when reporting any problems connecting to the FIT Network to TechHelp.
Mac OS
MAC Address
- Open System Preferences
- Select Network
- In the left-hand pane, select FITAIR
- IP Address will be visible on this screen
- Click Advanced in the lower right corner
- At the bottom of the windows, the device’s MAC address will be listed next to “Wi-Fi address”
IP Address
- Open System Preferences
- Select Network
- In the left-hand pane, select FITAIR
- IP Address will be visible on this screen
Windows 10
MAC Address “Physical Address
-
Right-click on the Start button and select Command Prompt from the menu
-
Type in “ipconfig /all” and press Enter. Your network configurations will display
-
Scroll down to your network adapter and look for the values next to “Physical Address,” which is your MAC address
IP Address
- Click the Start icon and select Settings.
- Click the Network & Internet icon.
- To view the IP address of a wired connection, select Ethernet on the left menu pane and select your network connection, your IP address will appear next to “IPv4 Address”.
- To view the IP address of a wireless connection, select WiFi on the left menu pane and click Advanced Options, your IP address will appear next to “IPv4 Address”.
Windows 8
MAC Address
-
Press the Windows Start key to open the Start Menu
-
In the search box, type “cmd” and press enter
-
In the Command Prompt type “ipconfig /all” and press enter
-
The MAC address will be listed next to “Physical Address“
IP Address
- In the system tray, click the network connection icon and select Open Network and Sharing Center.
- To view the IP address of a wired connection, double-click Local Area Connection and click Details, your IP address will appear next to “IPv4 Address”.
- To view the IP address of a wireless adapter, double-click Wireless Network Connection (Network Name) and click Details your IP address will appear next to “IPv4 Address”.
Windows 7
MAC Address “Physical Address
-
-
Open the Windows Command Prompt by clicking on the start menu and typing “cmd” in the search box and pressing enter
-
In the Command Prompt, type “getmac” and press enter
-
The MAC address will be listed under “Physical Address“
-
IP Address
- In the system tray, click the network connection icon and select Open Network and Sharing Center.
- To view the IP address of a wired connection, double-click Local Area Connection and click Details, your IP address will appear next to “IPv4 Address”.
- To view the IP address of a wireless adapter, double-click Wireless Network Connection (Network Name) and click Details your IP address will appear next to “IPv4 Address”.
Chromebook
MAC Address
- Sign in to your Chromebook
- At the bottom right, select the time.
- Select the Wi-Fi network .
- At the top of the box, select Information .
- You’ll see your Chromebook’s IP address and IPv6 address. Your MAC address is labeled “Wi-Fi.”
Apple TV
MAC Address and IP Address
- Go to the main menu on your Apple TV, and select “Settings”
- In the Settings Menu, select “About”
- The Apple TV’s MAC Address will be listed as either the Wireless ID or Ethernet ID (depending on the connection you are using)
- IP Address will be listed on this screen as well
Game Consoles and Entertainment Devices
MAC Address and IP Address
Consult the manual that came with your device. The MAC address is often printed on a label stuck to the device, or printed on the box it came in. Connect the device to a TV or monitor and explore any Settings or Preferences panels available to you.
How do I do a search for mail older than a certain date?
There is a long list of advanced search operators that you can use in Gmail. The list can be found here. One of the most powerful ones is to search for messages by date and here is how it is done:
The search box is at the top of your Gmail screen. Simply type one of the operators below and the date to define your search. Click the magnifying icon.
For example, if I wanted to get all mail older than 2010, I could type: before:2010/12/31
You can search a date range like the example below.
| after: before: older: newer: | Search for messages sent or received during a certain period of time (using the date format yyyy/mm/dd) | Example: after:2004/04/16 or before:2004/04/18 Meaning: Messages sent between April 16, 2004 and April 18, 2004.* *More precisely: Messages sent after 12:00 AM (or 00:00) April 16, 2004 and before April 18, 2004. |
| older_than newer_than | Similar to older and newer, but allows relative dates using d,m, and y for day, month, andyear | Example: newer_than:2d Meaning: Finds messages sent within the last two days. |
If you come up with multiple pages of results and you wanted, for example, delete all of those messages (be careful: remember trash is permanently deleted after 30 days in Gmail) you could check off the “select all” box in the upper left. Once you do that, the selected messages on that page will turn yellow. Now my search is telling me that I have 44 pages worth of email that is older than 2010. I could go through each page and select all and delete, or to make thing easier, Gmail will pop up a message asking if you would like to Select all conversations that match this search. If you click on those words all messages in that date range and all pages of those email will all be selected at the same time. You could now hit the delete button.

Supported Browsers
Chrome, Firefox, Safari, Edge, Opera, and Internet Explorer 8 or later. Some browsers do not support all of Duo’s authentication devices (for example, Security Keys won’t work with Internet Explorer). For the widest compatibility with Duo’s authentication methods, we recommend recent versions of Chrome and Firefox.
Sign in to FIT Remote Labs
Go to https://fitlabs.fitnyc.edu/
Sign in with your FIT username and password
Click the “Sign in” button

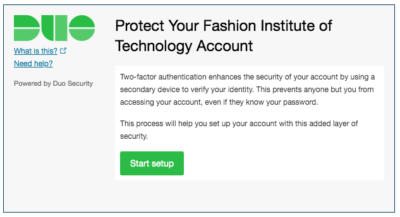
Welcome Screen
You will be presented with the “Start setup” window the first time you sign in to FIT Remote Labs at https://fitlabs.fitnyc.edu/.
For complete instructions on how to sign, please visit how to sign in to FIT Remote Labs.
Click Start setup to begin enrolling your device.
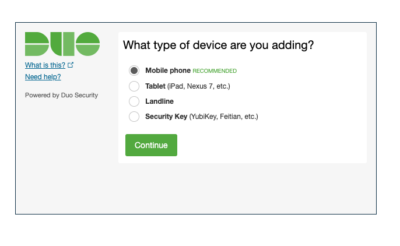
Choose Your Authentication Device Type
Select the type of device you’d like to enroll and click Continue.
We recommend using a smartphone for the best experience, but you can also enroll a landline telephone, a security key, or iOS/Android tablets.
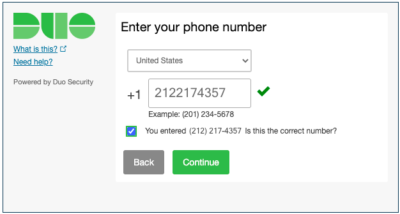
Type Your Phone Number
Select your country from the drop-down list and type your phone number. If you’re enrolling a tablet you aren’t prompted to enter a phone number.
Use the number of your smartphone, landline, or cell phone that you’ll have with you when you’re logging in to a Duo-protected service. You can enter an extension if you chose “Landline” in the previous step.
Double-check that you entered it correctly, check the box, and click Continue.
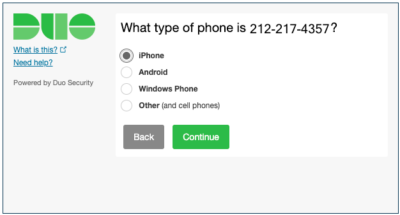
Choose Platform
Choose your device’s platform and click Continue.
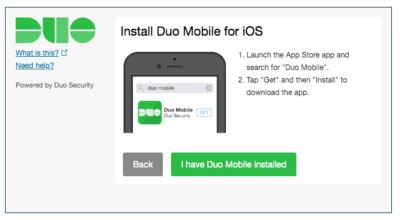
Install Duo Mobile
Duo Mobile is an app that runs on your smartphone and helps you authenticate quickly and easily. Please follow our instructions, How to install Duo Mobile. After installing our app, return to the enrollment window, and click I have Duo Mobile installed.
You will still be able to log in using a phone call or text message without Duo Mobile, but for the best experience, we recommend that you use Duo Mobile.
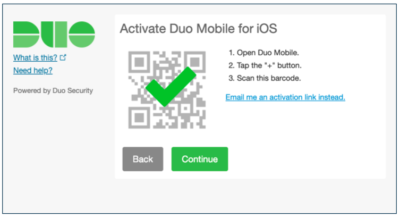
Activate Duo Mobile
Activating the app links it to your account so you can use it for authentication.
On iPhone, Android, and Windows Phone activate Duo Mobile by scanning the barcode with the app’s built-in barcode scanner. Follow the platform specific instructions for your device:
Can’t scan the barcode? Click “Email me an activation link instead.”
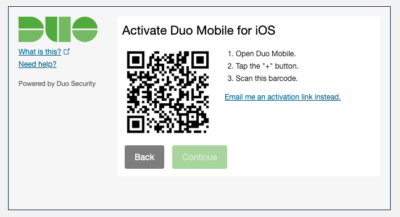
In Duo Mobile, scan the activation barcode.
The “Continue” button is clickable after you scan the barcode successfully.
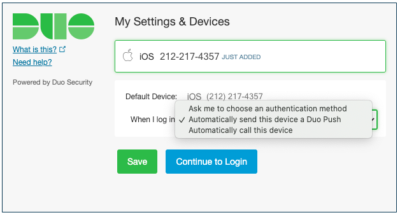
Configure Settings & Devices
If this is the device you’ll use most often with Duo then you may want to enable automatic push requests by changing the When I log in: option and changing the setting from “Ask me to choose an authentication method” to “Automatically send this device a Duo Push” or “Automatically call this device” and click Save.
With one of the automatic options enabled Duo automatically sends an authentication request via push notification to the Duo Mobile app on your smartphone or a phone call to your device (depending on your selection).
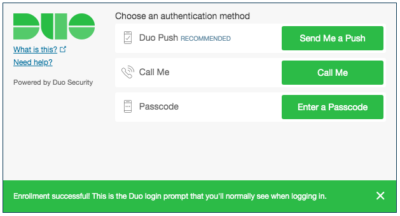
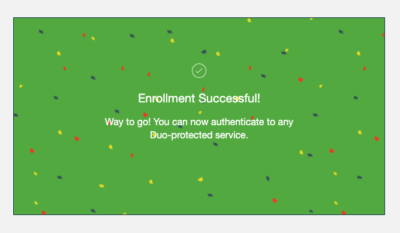
Congratulations!
Your device is ready to approve Duo push authentication requests. Click Send me a Push to give it a try. All you need to do is tap Approve on the Duo login request received at your phone.
2-Factor Authentication (2FA) is also referred to as 2-Step Verification.
- Sign in to your FIT Gmail Account
- Go to “Manage your Google Account” by clicking your profile icon on the upper right-hand side of the screen or by going directly to https://myaccount.google.com/.
- Using the left-hand menu, select “Security.”

- Scroll down to the “Signing in to Google” section and locate “2-Step Verification.” Then click the arrow on the 2-Step Verification row.

- Verify your account by re-entering your password. Reminder: Google will ask you to reenter your password whenever you make changes to your account’s security.

- Enter your phone number and select one of the radial buttons under “How do you want to get codes” or click show more options. Once you select your option, Click Next.
Note you may repeat the enrollment process to select additional verification methods.

Options Explained
- Confirm that it works by entering the code that was sent to the phone number you entered.

If you select “text message,” enter the 6-digit number received via text message.

If you selected “voice call,” enter the 6-digit code provided by the automated voice. Note: The phone call might come in as “potential spam.”

If you select “Google Prompt.” Remember, to use this option you need to have a phone number registered with Google if you do not first select Text message or Phone Call then repeat the enrollment process and select Google Prompt.
iPhone
If you have an iPhone open the Gmail app on your phone, and the prompt notification will appear (this takes a few seconds, it does not appear as an email; it is a pop-up message).
Andriod
If you have an Andriod, the prompt should appear in the form of a push notification. Push notifications turned off? Open the Gmail app on your phone, and the prompt notification will appear (this takes a few seconds, it does not appear as an email; it is a pop-up message).
If you requested the sign-in, tap “Yes” to allow it. If you didn’t request the sign-in, tap “No” to block it.

- Click “turn on” to fully enroll in 2-step verification for the FIT Google account.

Additional Details
You will also receive an email to your FIT Google account from “[email protected]” notifying you that 2-step verification has been turned on for your FIT account. You will receive additional email alerts when/if you turn on additional verification methods described below.

Use other verification methods
Once you are enrolled in 2-step verification, Google allows you to set up additional backup steps so you can sign in even if your other options aren’t available. You can set up other verification methods in case you:
- Want increased protection against phishing
- Can’t get Google prompts
- Lose your phone
Learn about alternate methods:
Backup codes
Google prompts
Authenticator App
Backup Phone
Security key
About devices you trust
If you don’t want to enter a 2-Step Verification code every time you sign in to your Google Account, you can mark your computer or mobile device as trusted. By default – the device you set up for 2-step verification will automatically be added to the “trusted list.”
When you sign-in on a new device, whether it be your phone, iPad, or just a different computer, you will need to verify your account using the 2-step verification method that you chose. When logging in, you can choose not to use 2-Step Verification again on that particular device or computer. Check the box “Don’t ask for codes again on this computer.”
From then on, that computer will only ask for your password when you sign in.

If anyone else tries to sign in to your account from another computer or location, 2-Step Verification will be required, and your account will be protected.
Learn more about how to add trusted devices to your account.